
Today I am sharing with you a glimpse into our monthly class. I am using the beautiful Springtime Foils DSP which you could earn as part of the Sale-a-Bration promotions earlier in the year. Whilst this particular DSP is no longer available, the project can be made using any of our beautiful DSP and remember there will be a whole new selection to choose from come 1st June!!!
Here is the project...


This box is a slightly smaller version of the box I made as part of the Kre8tors Blog Hop for May, you can see my blog post here!
The previous box was covered in cardstock and had a join as it required larger than 12 x 12. This box however you can make from one piece of DSP but is still a great size measuring 12cm x 7.5cm x 4cm deep.
Please see below for a tutorial but first, here are some of the cards we made.


Tutorial
Cut five pieces of board (you can use the board from the back of the Speciality DSP) or any grey board is fine. The five pieces should measure as follows:-
12cm x 3cm (flap)
12 cm x 7.5cm (bottom)
12cm x 4cm (x2) (sides)
12cm x 7.9cm (top)

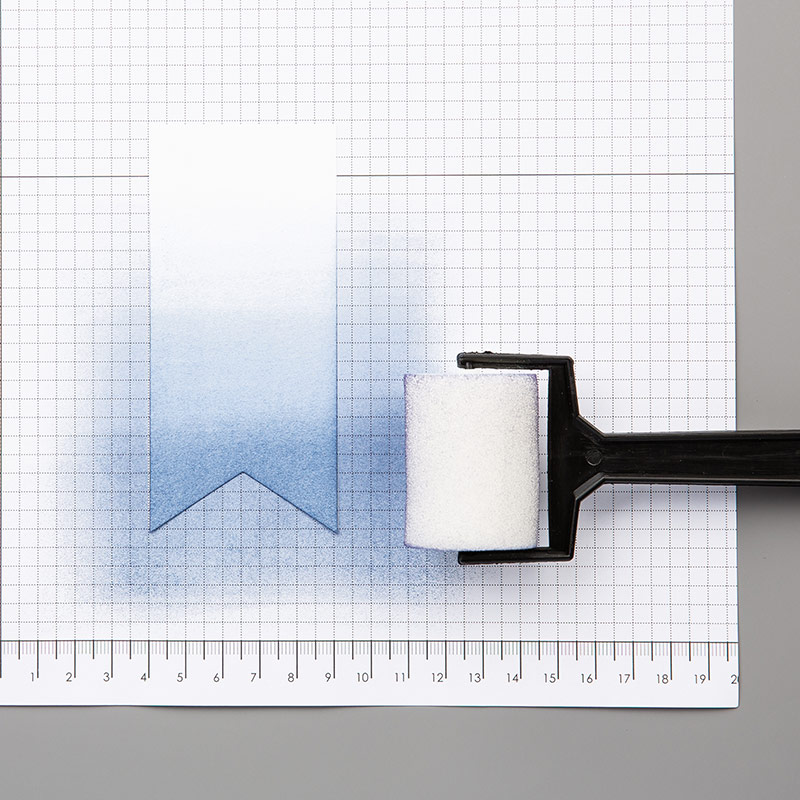
Cut a piece of DSP to measure 30.5cm x 15cm. I coloured my DSP using the sponge brayers (these are the best!) using Blushing Bride, Flirty Flamingo and Rose Red
Add a thin layer of glue to the reverse of the DSP and position your pieces as follows making sure you leave approx. 3mm gap between each section:
Left to right: Flap - Top - Side - Bottom - Side

Remove the excess corners from the DSP, cutting approx. 3mm away from each corner, as shown.


Using a bone folder, score lightly along the edges of the board and fold the DSP over to the reverse, gluing in place. I usually start with the longer sides first and then 'squidge' the corners in before gluing the short ends in place.


Use your bone folder to make a crease between each section.
Cut a piece of co-ordinating cardstock (I used Rose Red) to measure 27.5cm x 11.8cm. Add a thin layer of glue all over and glue onto the reverse of your covered panels. NB if you are using an alternative fastening such as a ribbon loop you will need to secure this in place before gluing the lining in place (see below).

Using your bone folder, crease between the sections on the reverse and the front, as shown.


Find the centre point on the small flap of your box and punch a hole before securing the Sam Browne stud in place. You can use alternative fastenings of your choice such as a ribbon loop but this would need to be secured in place before adding the lining to your cover. You could do this by punching a hole, insert a ribbon loop and glue the ends on to the back of your cover before securing the lining in place.
Cut a piece of cardstock (Blushing Bride) to measure 23.8m x 19.5cm
Score on the landscape edge at 2cm, 6cm, 17.8cm and 21.8cm
Score on the portrait edge at 2cm, 6cm, 13.5cm and 17.5cm
Cut as shown and glue the box together before gluing the spare flaps inside to reinforce your box.


I lined the inside edges of my box with Rose Red to measure:-
11.6cm x 3.8cm (x2)
7.2cm x 3.8cm (x2)
Glue your box on to the base of your cover before gluing the front side of the box to the front side of the box.

Finally, add a magnet to the front of your box to line up with the Sam Browne screw and decorate your box.
I hope you will have fun making the box and I look forward to seeing your creations.
If you have any questions then please message me and I will try and help.
Happy Stampin!
Jo
x
 |  |  |  |  |
 |  |  |  |  |
 |  |  |  |  |
 |  |  |
Table built using Product Table Builder by The Crafty Owl - Independent Stampin' Up! Demonstrator.
Love your box tutorial and i am sure i am going to make one.thank jou die sharing.
ReplyDeleteGreetings from the Nederlands